If you’ve ever admired the beauty of a rustic barn, a cozy cabin, or even a charming old house, chances are you were looking at some fine examples of timber framing. This ancient craft isn’t just about stacking wood; it’s an art and science rolled into one. Whether you’re a DIY enthusiast, a budding builder, or just curious about how those stunning wooden structures stand tall and proud, this friendly guide will walk you through essential timber framing techniques that make structures both strong and stunning.
What Is Timber Framing Anyway?
Before we dive deep, let’s break down what timber framing is all about. Timber framing is a traditional method of building where large wooden beams are joined together with carefully crafted joints—no nails or screws needed! This technique has been around for centuries and has stood the test of time, both in durability and aesthetics.
Why Choose Timber Framing?
- Durability: Timber-framed buildings can last hundreds of years if maintained properly.
- Eco-friendly: Using wood from sustainable sources makes this method green and renewable.
- Aesthetic appeal: The exposed wooden beams add warmth and character that modern construction often lacks.
- Flexibility: Timber framing can adapt to various styles, from rustic to ultra-modern.
Alright, now that you’re on board, let’s explore some timber framing techniques that ensure your structure is as solid as it is stunning.
Essential Timber Framing Techniques
Selecting the Right Wood
Before you get started, picking the right timber is crucial.
- Hardwoods vs. Softwoods: Hardwoods like oak or maple are incredibly strong but often more expensive. Softwoods like pine or cedar are lighter and easier to work with.
- Moisture content: Wood with too much moisture can warp or crack over time. Aim for timber that’s been dried to the right moisture level (usually around 15-20%).
- Grain and knots: Look for straight grain with minimal knots for strength and aesthetic reasons.
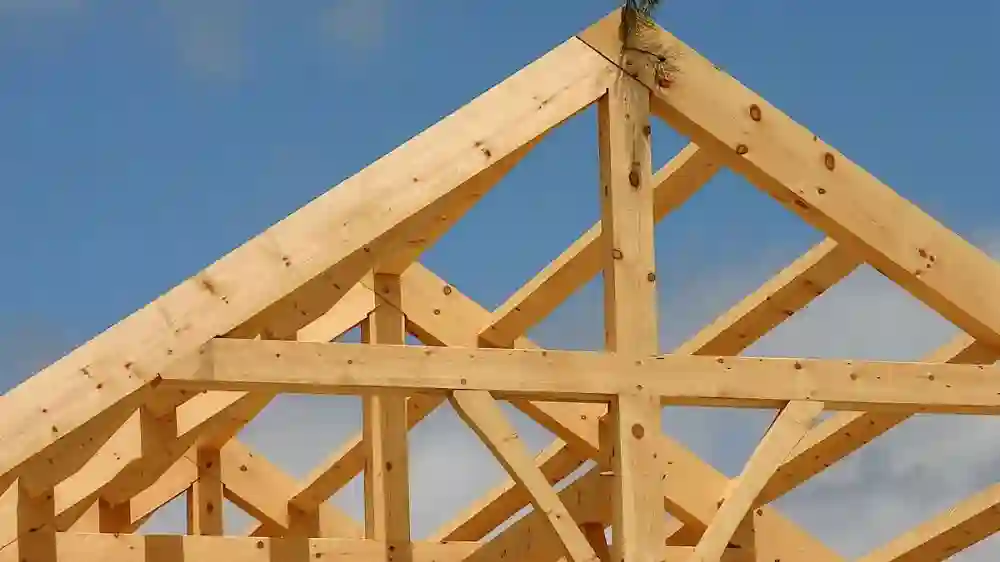
Joinery Methods That Hold It Together
One of the coolest parts about timber framing is the joinery—how the beams fit together. Here are some classic joinery techniques:
Mortise and Tenon Joints
- A mortise is a cavity cut into a timber, and a tenon is a projecting piece shaped to fit into that cavity.
- These joints provide incredible strength without nails or screws.
- Often secured with wooden pegs called trunnels or treenails.
Dovetail Joints
- Interlocking wedge-shaped cuts that lock beams together.
- Popular in corners for both strength and visual appeal.
Scarf Joints
- Used to join two beams end-to-end.
- Often reinforced with wooden pegs or metal plates.
Tools for Perfect Timber Framing
Even if you’re a beginner, having the right tools makes a world of difference:
- Chisels for cleanly cutting joints.
- Hand saws or power saws for precise cuts.
- Mallets to tap joints together.
- Squares and measuring tapes to ensure everything lines up.
Building a Timber Frame: Step by Step
Step 1: Design and Planning
Like any good project, timber framing starts with a solid plan.
- Draw up your structure with all beams and joints.
- Decide on the timber sizes.
- Plan for load-bearing points and openings (like windows and doors).
Step 2: Cutting and Preparing Timber
- Cut beams according to your design.
- Mark out joints carefully.
- Test fit pieces before assembly.
Step 3: Assembly on the Ground
- Lay out beams and join them using your chosen joints.
- Use clamps or temporary supports as needed.
- Double-check alignment.
Step 4: Raising the Frame
- With help, lift the assembled frame into position.
- Secure it temporarily.
- Add bracing for stability.
Step 5: Finishing Touches
- Fill any gaps or cracks with wood filler or caulk.
- Sand beams for smoothness.
- Apply finishes like stains or sealants to protect wood.
Tips to Make Your Timber Frame Both Strong and Beautiful
- Use proper bracing: Diagonal braces help prevent racking and sway.
- Mind the load: Know where the weight will go and reinforce accordingly.
- Expose the joints: Show off your craftsmanship by leaving joinery visible.
- Play with contrast: Mix timber framing with stone or glass for a modern twist.
- Maintain regularly: Wood loves care—check for pests, rot, or moisture damage yearly.
Common Timber Framing Styles to Explore
Post and Beam
- Straightforward style with vertical posts and horizontal beams.
- Great for barns and open spaces.
Balloon Framing (Timber Variant)
- Long continuous studs from foundation to roof.
- Less common today but offers tall, slender frames.
Hammerbeam
- Decorative, often seen in large halls or churches.
- Exposed curved beams create a dramatic look.
Why Timber Framing Is Making a Comeback
People are falling in love with timber framing again—not just for nostalgia but because:
- It’s sustainable and kind to the planet.
- Offers energy efficiency with proper insulation.
- Creates unique, cozy spaces that steel or concrete can’t match.
- Supports custom, handcrafted designs.
Plus, if you ever want to brag, you can say your house uses the same construction techniques as medieval castles. How cool is that?
Wrapping It Up: Your Timber Framing Journey Starts Here
So there you have it — a friendly intro to timber framing techniques that can help you build structures that are not only strong but seriously eye-catching. Whether you’re looking to build a new shed, a full home, or just want to geek out over wood joinery, timber framing is a timeless skill worth knowing.
Remember, the key is choosing the right wood, mastering classic joinery, and planning carefully. Oh, and don’t forget to have fun while you’re at it! After all, every beam you place is a piece of history you’re crafting yourself.
Happy framing!